

If your work environment is like ours here at SAS, you’re seeing more of your data and applications move to the cloud. It’s not yet a complete replacement for having local files on your desktop machine, but with cloud storage and apps — like Microsoft OneDrive — I can now access my work documents from any browser and any device, including my smartphone. I can now update my spreadsheets while waiting in the dentist office. Oh joy.
For those of us who use SAS to read and create Microsoft Excel documents, cloud-based files can add an extra wrinkle when we automate the process. It also adds some exciting possibilities! The Microsoft 365 suite offers APIs to discover, fetch, and update our documents using code. In this article, I’ll show you how to use SAS programs to reach into your Microsoft OneDrive (or SharePoint Online) cloud to read and update your files. Note: All of this assumes that you already have a Microsoft 365 account — perhaps provisioned by your IT support team — and that you’re using it to manage your documents.
This article helps you to connect your SAS program code to Microsoft 365. If what you really want to do is connect your Microsoft 365 applications (Excel, PowerPoint, etc.) to SAS with “point-and-click”, then check out SAS for Microsoft 365, which you can use to work with SAS Viya content in your favorite Office apps.
A SAS macro library to help with the basics
UPDATE 13Aug2026: Earlier versions of this article relied exclusively on delegated user authentication. The SAS Microsoft Graph API project now supports client-secret-based authentication, which can eliminate the need for interactive sign-in in approved automation scenarios. It also supports helper methods for Device Code auth, and also some methods for detecting Sensitivity Labels on documents.
For most SAS users, the main goal is to be able to list files and folders in Microsoft 365, download any file to SAS, and upload files from SAS to SharePoint or OneDrive. If that’s your situation, then I’ve got you covered with some SAS macros that hide much of the complexity.
I’ve created this project on GitHub with SAS macros to automate the most common tasks. You will still need to complete Step 1 and Step 2 as described in this article, but after that the macros help with the most common tasks. I’ve recorded a special video that shows how to get started with these macros. (The video features SAS Viya Workbench, but you do not need SAS Viya Workbench or any other specialized SAS products to use this technique.)
These macros include logic to manage some of the trickier aspects of the Microsoft Graph API:
- They provide a way to manage your access token and credentials safely, whether you store them in a secure file (SAS 9 or SAS Viya) or in SAS Content folders (SAS Viya only).
- The routines to list folders and files will include all items in the collections. The Microsoft Graph APIs return a maximum of 200 items with each call, but these macros detect this situation and will make multiple calls to retrieve the full set.
- When publishing content from SAS to a OneDrive or SharePoint folder, the method for uploading files is complex. For large files, the API requires that you create an “upload session” and split the file into chunks. Each chunk is uploaded via an API call and then reassembled on the other side. These SAS macros manage the file splitting, upload session, and iterative upload requests until the file publish is complete. (Learn more about the file splitting technique in this article.)
You can study the code in these macros to implement in your own way, or you can simply use them “as-is” for these common operations. This article uses this macro library in its examples.
Learning more about how to connect SAS to Microsoft 365
Note: I’ve updated this article several times to include detailed steps and “gotchas.” I’ve added use cases for SharePoint Online and Microsoft Teams. I also recorded a 25-minute video (posted on SAS Support Communities) that shows all of the steps that I followed.
You can also watch this Ask the Expert webinar to learn everything that I discuss here, and see demonstrations of the techniques in action.
Using SAS with Microsoft 365: an overview
Microsoft 365 supports multiple OAuth2 authentication patterns. The examples in this article use delegated authentication, where a user signs in and grants access to the application. The SAS Microsoft Graph API macro library now also supports application authentication using a client secret, which allows SAS jobs to access Microsoft 365 without an interactive user sign-in. This is useful for scheduled jobs and service accounts, when working with a very limited scope of content or SharePoint sites.
When we’re writing SAS programs to access Microsoft OneDrive or SharePoint, we’re actually writing a third-party app. This requires several setup steps, a few of which cannot be automated. Fortunately, these need to be done just once, or at least infrequently. Here’s an outline of the steps:
- Register a new client application at the Microsoft Azure Portal. (You will need to sign in with your Microsoft 365 credentials, which might be your primary organization credentials if you have single-signon with Active Directory.) You can do this just once in your organization; multiple users can connect using the same application!
- Using your browser while you are signed into Microsoft 365, navigate to a special web address to obtain an authorization code for your application.
- With your authorization code in hand, plug this into a SAS program (PROC HTTP step) to retrieve an OAuth2 access token (and a refresh token).
- With the access token, you can now use PROC HTTP and the Microsoft 365 APIs to retrieve your OneDrive folders and files, download files, upload files, and replace files.
You’ll have to complete Step 1 just once for your application or project. Steps 2 and 3 can be done just once, or at least just occasionally. The access token is valid for a limited time (usually 1 hour), but you can always exchange the refresh token for a new valid access token. This refresh token step can be automated in your program, usually run just once per session. Occasionally that refresh token can be revoked (and thus made invalid) when certain events occur (such as you changing your account password). When that happens, you’ll need to repeat steps 2 and 3 to get a new set of access/refresh tokens.
Note: The examples later in this article use delegated user authentication because it is the most common starting point for SAS users. If you’re building an unattended process that doesn’t have a user attached, read the Client Secret section before proceeding.
Variations:
- Instead of an interactive login step in your browser to capture the authorization code, you can use Device Code authentication to verify your identity and access. See instructions in the GitHub project.
- Instead of user-based delegated access, you can use the “client secret” method, which is like a password for your app. This approach is perfect when you don’t want to tie the actions to a specific user account, and your tasks are limited to just a small set of files, folders, or SharePoint site. The macros in the GitHub project support this method as an alternative.
The following table can help you decide which authentication method is best for your situation:
| Scenario | Recommended method |
|---|---|
| Interactive SAS user accessing their own files | Device Code Flow or Auth Code Flow |
| Interactive SAS user accessing SharePoint/OneDrive | Device Code Flow or Auth Code Flow |
| Scheduled batch process on behalf of one user | Device Code Flow or Auth Code Flow |
| Scheduled batch process with no set user (service account) | Client Secret |
Oh, and by the way, even though the examples in this article are specific to SharePoint and Teams, the exact same authentication flow and steps can be used for all of the Microsoft 365 APIs. Have fun with OneDrive, Outlook, Teams, Excel, and all of your favorite cloud-based Microsoft apps.
Step 1: Register your application
Visit the Microsoft Application Registration portal to register your new app. You’ll sign in with your Microsoft 365 credentials.
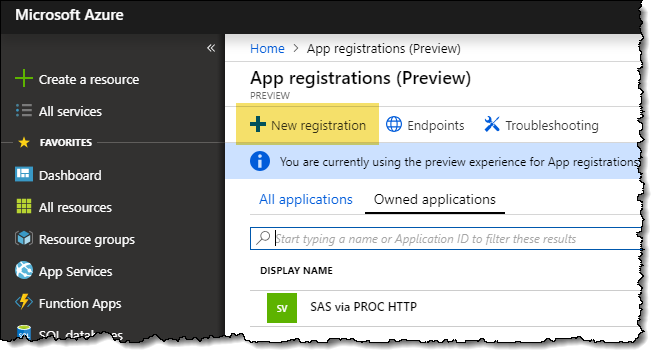
Remember: Multiple people can use the same registered app. Each user will need to sign in and get their own personal access tokens (covered in a later step). If your team (or everyone in your company) uses the same app, then you need to do this step only once! If your team standardizes on a single app, it’s a good idea to tell your IT support staff that’s what you intend to do. Then they will know to expect to see activity from multiple users.
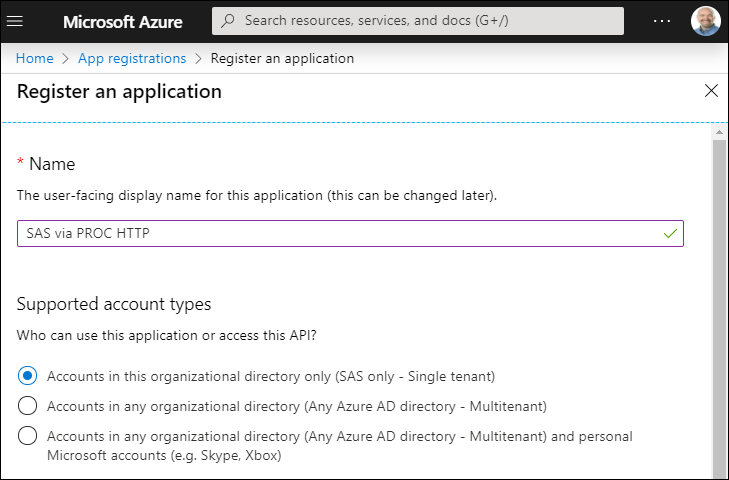
Click New Registration to get started. This presents you with a form where you can complete the details that define your app. Mainly, you’re giving it a name and defining its scope. You’ll probably want to limit its use to just your organization (your company) unless you’re collaborating with colleagues who work elsewhere.
As you register your application, you also need to provide a redirect URL for the authorization flow. In our example, our app is considered “Public client/native (mobile/desktop).” The standard URL to indicate this is:
https://login.microsoftonline.com/common/oauth2/nativeclient
In the Redirect URI section, select this option and specify this URL value.

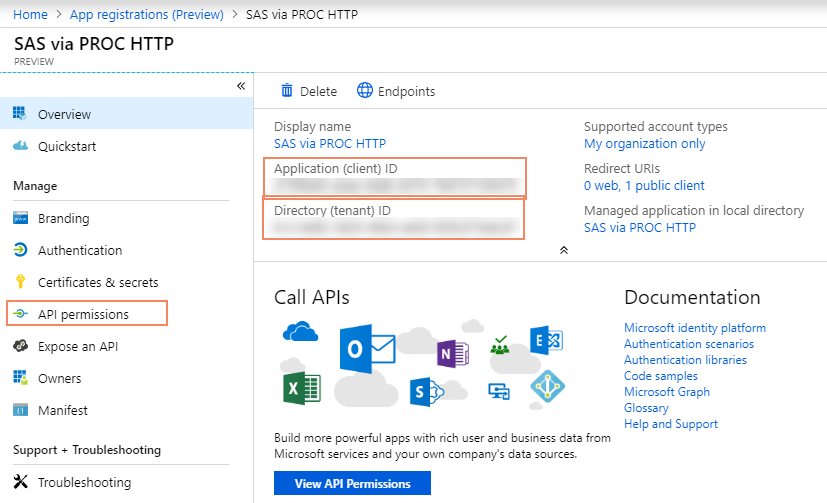
When you create an app, you’ll receive a Client ID (unique to your app) and Tenant ID (unique to your organization). You’ll need these values to obtain your authorization code and tokens later. The application portal provides a sort of control center for all aspects of your app. (Note: I masked out my client ID and tenant ID in this screenshot.)
Specifying your app permissions
Your app will need specific permissions in order to function. In my example, I want my SAS program to read documents from SharePoint and OneDrive, and also add new docs and update existing docs. The permissions I need are:
- Files.ReadWrite.All: Allows the app to read, create, update and delete all OneDrive files that you can access.
- User.Read: Allows you to sign in to the app with your organizational account and let the app read your profile.
- Sites.ReadWrite.All (if using SharePoint): Allows the app to read, create, update and delete SharePoint Online files for sites that you can access.
To add these to your app, click the API Permissions tab in the control center. To be clear, these are not permissions that your app will automatically have. These are the permissions that will be requested when you “sign into” the app for the first time, and that you’ll have to agree to in order for the app to run.
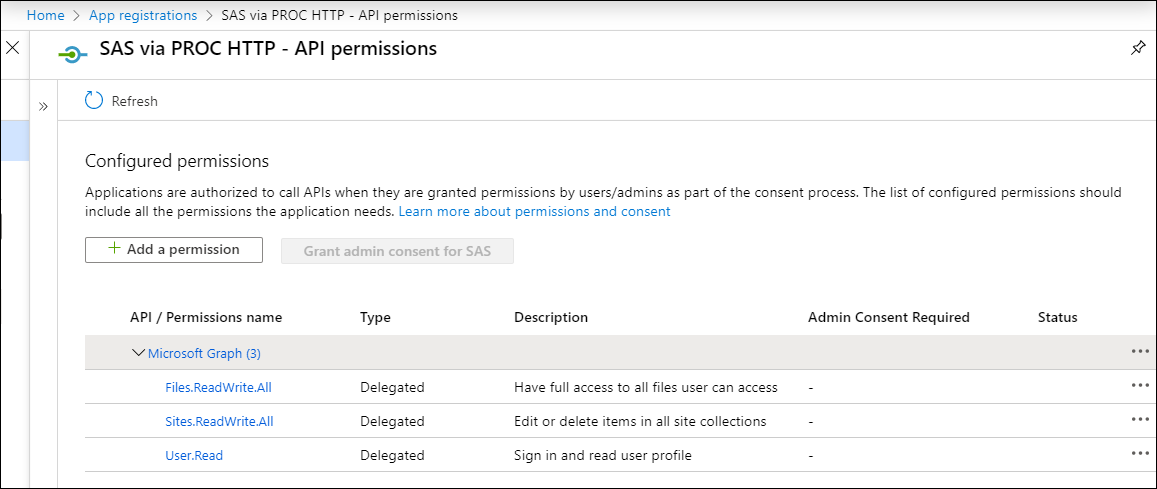
Permission types have their own terminology that is important to understand:
- Delegated versus Application Permissions: In our example, we are sticking to Delegated permissions, which allow the application to take actions on behalf of the signed-in user and provides access to the user’s data. However, some use cases require use of Application permissions, which allow the application to take actions without a signed-in user and potentially access data across the system and different users.
- Admin Consent Required: Some permissions cannot be delegated or granted without the approval of an administrator. This restriction permits the organization to maintain oversight of the important resources that might be accessed by the application and to prevent unauthorized uses. The Microsoft Azure Portal provides an easy way for you to submit a request to an admin, so you can get the permissions that you need. However, I recommend that you follow up (or better yet, precede this) with a formal request to your IT support staff to state what you need and your business case. In my experience, this helps to expedite the process. A good working relationship with IT is important for any SAS user!
The documentation for the Microsoft Graph API provides a comprehensive list of the permission names, whether they are Delegated or Application level, and whether Admin Consent is required. This documentation also includes a helpful 4-minute video on the topic.
While here, look at what’s needed for Device Code Flow: While defining your app, consider enabling “Allow Public Client Flows” (under Authentication settings). This is necessary if you want to use the Device Code authentication flow (described later). Since your app does not need or store client credentials — and relies only on delegated privileges — this is considered a safe setting.
Considerations: If using Client Secret Authentication
Client secret authentication uses Application Permissions rather than Delegated Permissions. In this model, the application acts as its own identity and does not require a user sign-in. A client secret is generated and stored securely, then exchanged for an access token during program execution.
When using a client secret, avoid broad permissions such as Files.ReadWrite.All, Sites.ReadWrite.All, or Sites.FullControl.All. Instead, favor Sites.Selected, Files.SelectedOperations.Selected, or Lists.SelectedOperations.Selected and grant access only to the resources required by the application. With this approach, apply the Principle of Least Privilege: Always request the minimum permissions necessary for the app to function.
| Scenario | Typical permissions |
|---|---|
| Personal OneDrive | Files.ReadWrite.All, User.Read |
| SharePoint as user | Sites.ReadWrite.All, User.Read |
| Scheduled app access | Sites.Selected (+ resource-specific grants) |
Probably required: Obtaining admin consent
We’re creating an app that hooks into your enterprise productivity suite — and that’s usually the domain of IT professionals. At SAS we are a tech company with many “citizen app developers”, so our IT grants us more latitude than you might find at other places. But even at SAS, “normal” employees can’t just create apps and empower them with access to our data. We have a process.
Because it’s a common request, our IT folks created a form that makes it easy for them to review requests for new apps in our Microsoft 365 environment. The form asks:
- Your app name (“SAS via PROC HTTP” for mine)
- Your App (client) ID
- Grant type – my instructions assume “Authorization code grant type”, but you can use “client secret” for narrowly scoped applications.
- Whether you need additional Delegated API permissions: Most need ‘Files.ReadWrite.All’ for OneDrive, ‘Sites.ReadWrite.All’ for SharePoint (in addition to the default ‘User.Read’).
- Whether your app needs Application Permissions. (Note: Answering YES here will trigger more scrutiny, but is necessary for “client secret” approach.)
Download and include ms-graph-macros.sas code
The GitHub repository contains a SAS program (named ms-graph-macros.sas) with all of the macro routines you need for the remaining tasks. Download this file to a local folder and use %INCLUDE to submit in SAS.
%let src= |
You can also include directly from GitHub:
/* Run just once in your session */ options dlcreatedir; %let repopath=%sysfunc(getoption(WORK))/sas-microsoft-graph-api; libname repo "&repopath."; data _null_; rc = git_clone( "https://github.com/sascommunities/sas-microsoft-graph-api", "&repoPath." ); put 'Git repo cloned ' rc=; run; %include "&repopath./ms-graph-macros.sas"; |
Creating a configuration file and set its folder location
There are a few app-specific values that we’ll need to reference throughout the SAS programs we’re writing. The macros I’ve provided use a configuration file for these settings rather than hard-code them into SAS statements.
I created a file named config.json that looks like this (but with different tenant_id and client_id values):
{
  "tenant_id": "206db638-6adb-41b9-b20c-95d8d04abcbe",
  "client_id": "8fb7804a-8dfd-40d8-bf5b-d02c2cbc56f3",
  "client_secret": "OPTIONAL! ONLY IF USING CLIENT CREDENTIALS AUTH",
  "redirect_uri": "https://login.microsoftonline.com/common/oauth2/nativeclient",
  "resource" : "https://graph.microsoft.com"
}
Note: the client_secret value should be used only for Client Secret authentication. Auth Code and Device Code methods do not need it.
Designate a secure location for this file and for your token.json file (to be created in a later step). The information within these files is sensitive and specific to you and should be protected. See How to protect your REST API credentials in SAS programs for guidance.
If you are using SAS Viya, you can optionally create this folder and file in your SAS Content area that is private to you. For example, create a “.creds” folder within “/Users/your.account/My Folder”. By default, only your account will be able to read content you place there.
The macro routines need to know where your config.json and token.json file are located. The initConfig macro initializes this.
/* This path must contain your config.json, and will also */ /* be the location of your token.json */ %initConfig(configPath=/u/yourId/Projects/ms365); |
If you are using SAS Viya and you would like to store your config and token files in the SAS Content folders (instead of the file system), this is supported with a boolean flag on initConfig. For example, if you store config.json in a folder named .creds within your SAS Content user home, this tells the macro to look in that folder:
%initConfig(configPath=/Users/your.account/My Folder/.creds, sascontent=1); |
Note: This sascontent flag is needed to tell the macro to use the FILENAME FILESVC method to access the SAS Content area. It requires a different file access method than traditional file systems.
Step 2: Obtain an authorization code (Auth Code Flow or Device Code Flow)
Before continuing, you need to decide which authentication flow you want to use. The GitHub project includes PowerShell and SAS implementations for both Auth Code Flow and Device Code Flow, and you can pick whichever method is easiest or most reliable in your environment.
Option A: Authorization Code (Auth Code) Flow – More interactive, more steps
The Auth Code flow opens a browser window and walks you through an interactive Microsoft sign‑in. This step needs to be completed from a web browser while I am signed into my Microsoft 365 account. The web address is very long…but we can use a SAS program to generate it for us.
This helper macro will generate the URL you can use to generate an auth code.
This produces these output lines in the SAS log:
 Paste this URL into your web browser:
 -- START -------
https://login.microsoftonline.com/206db638-6adb-41b9-b20c-95d8d04abcbe/oauth2/authorize?client_id=8fb7804a-8dfd-40d8-bf5b-d02c2cbc56
f3&response_type=code&redirect_uri=https://login.microsoftonline.com/common/oauth2/nativeclient&resource=https://graph.microsoft.com
 ---END ---------
Copy and paste the URL (all on one line, no spaces) into the address bar of your web browser. When you press Enter, you’ll be prompted to grant the required permissions:
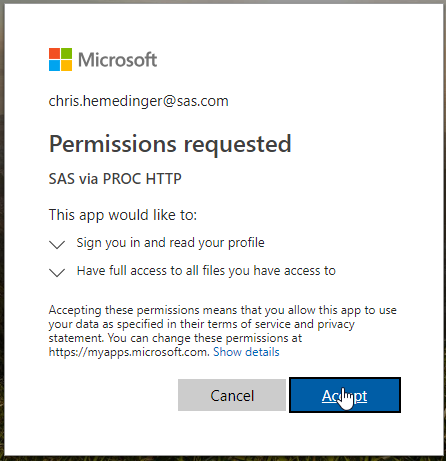
Once you click Accept, the browser will redirect to what looks like a blank page, but the URL contains the authorization code that we need:

Copy the value that appears after the code= in the URL, only up to the &session= part. It’s going to be a very long string — over 700 characters. We’ll need that value for the next step.
Note: if you don’t see the permissions prompt but instead see something like this:
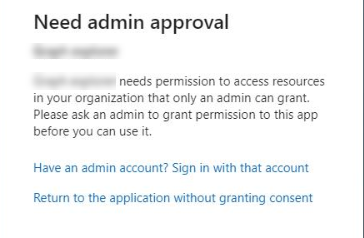
Then you probably need to work with your IT support to grant consent for your app. See the section “Probably required: Obtaining admin consent” above.
If you just generated your auth code for the first time or needed to get a new one because the old one was revoked or expired, then you need to use the auth code to get an initial access token.
/* Note: this code can be quite long -- 700+ characters. */ %let auth_code=PASTE-YOUR-AUTH-CODE-HERE; /* Now that we have an authorization code we can get the access token This step will write the token.json file that we can use in our production programs. */ %get_access_token(&auth_code.); |
When successful, token.json will be created/updated in the config directory you specified.
Note: This method is the traditional OAuth 2.0 approach, and it still works but there is an important recent change. Microsoft now displays an anti‑phishing warning during the redirect, and the browser automatically navigates away from the code result after a short delay, making it harder to manually capture or view the returned code.
Because of this new security behavior, the Auth Code flow is now slightly more cumbersome and timing‑sensitive than it was previously, especially if you rely on manually copying the returned code value. The GitHub project includes a PowerShell helper that automates the code return and makes it easier to grab and parse the code from the URL, so if you still prefer Auth Code flow, use the included PowerShell approach rather than relying on the raw browser response.
Option B: Device Code Flow – Simpler UX but requires Public Client support
Device Code flow displays a brief short-lived “device code” in your terminal or SAS log and instructs you to visit https://microsoft.com/devicelogin on any browser. After you authenticate there, the program polls until the token is ready. Device Code flow is often the easiest option because:
- No redirect URIs are involved
- No embedded browser is required
- You can complete authentication on any device, including your phone.
To use Device Code authentication in SAS with this macro library:
- Call
%generateDeviceCode();to create a temporary device code - Open the device login URL displayed in the SAS log
- Enter the device code when prompted
- Complete authentication in your browser
- Call
%confirmDeviceCodeToken();to retrieve and store your access token. By default, this macro will continuously poll the login service until you either complete the authentication or the code expires (usually 15 minutes).
The token will be saved to token.json (in your config folder) for future use. Here’s an example sequence:
%initConfig(configPath=/path-to-config.json); %generateDeviceCode(); /* Use the URL and code to log in, then run the following */ %confirmDeviceCodeToken(); |
This prints the device login and unique, temporary code to the SAS log:
Complete the device login using your local browser:
-- INSTRUCTIONS -------
To sign in, use a web browser to open the page https://microsoft.com/devicelogin and enter the code [UNIQUECODE] to authenticate.
---END ---------
Use your web browser to complete the authentication. You’ll be prompted to log into your Microsoft 365 environment (including all multifactor login steps). You will then be asked to confirm the access for your application. The following screen captures illustrate the steps.
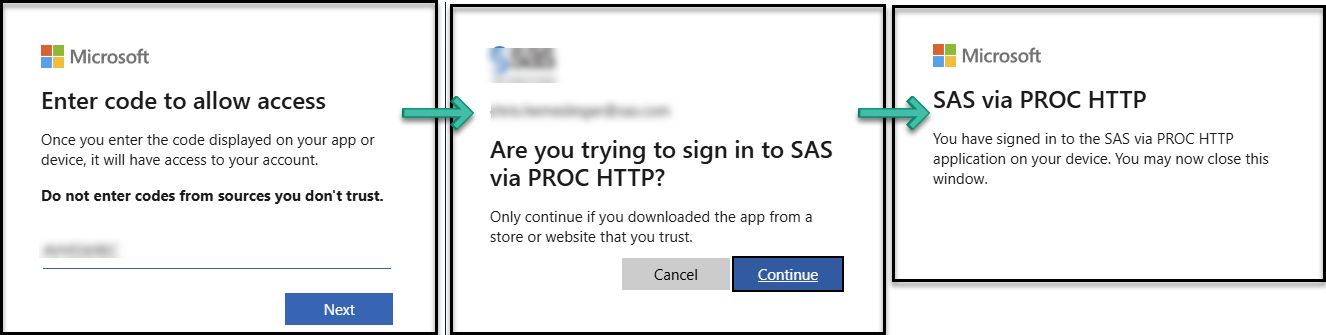
If you’ve ever used your phone to connect a streaming service to your smart TV, the Device Code flow will feel familiar.
However, there are two important restrictions:
- Your app registration must have “Allow public client flows” enabled, because Device Code is a public‑client‑only authentication method. This is easy to set in the app properties within your Azure or Entra ID portal.
“Allow Public Client Flow” is a safe setting when your app does not require/store your personal or client credentials — all true for the process documented here. - And yet, your organization may restrict Device Code flow — some admins now allow it only for Intune‑managed devices — or block it entirely due to recent guidance around phishing‑resistant auth policies.
If Device Code flow is permitted in your tenant, it is typically the most reliable option — especially for automation or CLI‑based workflows.
Option C: Client Secret (Client Credentials Flow)
Client Secret authentication is intended for unattended automation. Instead of prompting a user to sign in, SAS exchanges the application’s client ID and client secret for an access token. No browser interaction is required. This approach is ideal for:
- Scheduled SAS batch jobs
- Nightly report publishing
- Automated file transfer processes
- Service account integrations
Because the application acts on its own behalf, permissions must be granted directly to the application and managed carefully. A client secret should be treated like a password and stored securely.
Which authentication approach should I use?
If the task needs to access content as-a-user, then use Device Code flow — if your org allows public client flows and you want the simplest sign‑in experience. Use Auth Code flow if your org blocks Device Code or if you prefer the standard OAuth pattern. PowerShell and SAS examples are included in the GitHub project.
Regardless of which method you choose, the remaining steps in the workflow are the same: once you obtain the authorization result (Auth Code or Device Code completion), you exchange it for your access/refresh tokens and proceed with the rest of the process.
With Client Secret flow, you get an access token simply by supplying the client_secret value as you authenticate. Unlike Auth Code and Device Code authentication, Client Secret authentication does not require a refresh token. The application simply requests a new access token whenever needed.
Your IT support may have a preferred authentication method that they like to support, so it’s wise to check within your org for any policies or proven “happy paths” to getting the necessary approvals. Although we discuss SAS integration in this article, the same techniques apply to many different technologies, so the requests and business cases are likely not unique within your organization.
IT preferences aside, here are broad recommendations:
- Use Device Code for most SAS users.
- Use Auth Code if Device Code is blocked by policy.
- Use Client Secret for automation and scheduled processes.
- Use Client Secret only when your organization approves Application Permissions and you can secure the client secret password appropriately.
Use this table to compare authentication options and their features at-a-glance:
| Feature | Auth Code | Device Code | Client Secret |
|---|---|---|---|
| Interactive login required | Yes | Yes | No |
| Browser needed | Yes | Any browser/device | No |
| Refresh token used | Yes | Yes | No |
| Works for unattended jobs | Limited | Limited | Yes |
| User identity preserved | Yes | Yes | No |
| Can access personal files (OneDrive) and profile info | Yes | Yes | No |
| Application permissions required | No | No | Yes |
Step 3: Obtain an access token
You should now have both config.json and token.json in your designated config folder. This screenshot shows an example of these files in a hidden folder named “~/.creds”.
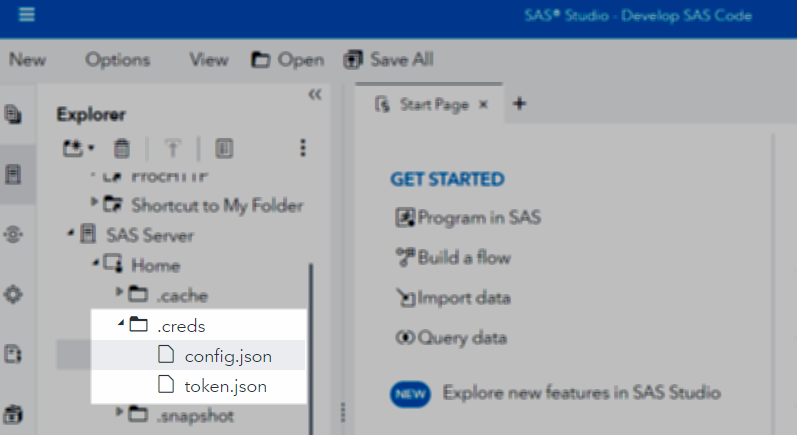
The content of the token.json will look something like this: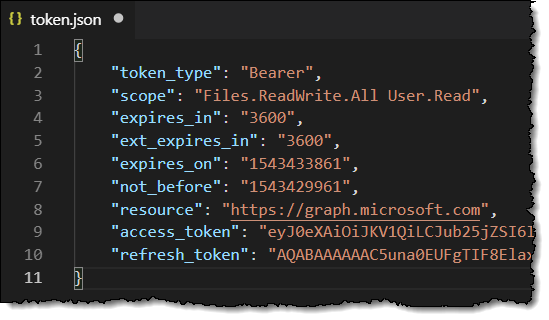
IMPORTANT: It’s very important that you keep this file secure and private to you (do not share!). With the information in this file (your refresh token) and your config.json file (with your client ID and tenant ID), anyone can use these code techniques to impersonate you and access your Microsoft 365 data.
Using Microsoft 365 APIs to access SharePoint and OneDrive content from SAS
Whew! I’ve spent nearly 1500 words to get this far, so thanks for sticking with me. The good news is that these steps take much longer to describe than to actually execute. Plus, creating apps is fun! (Right?)
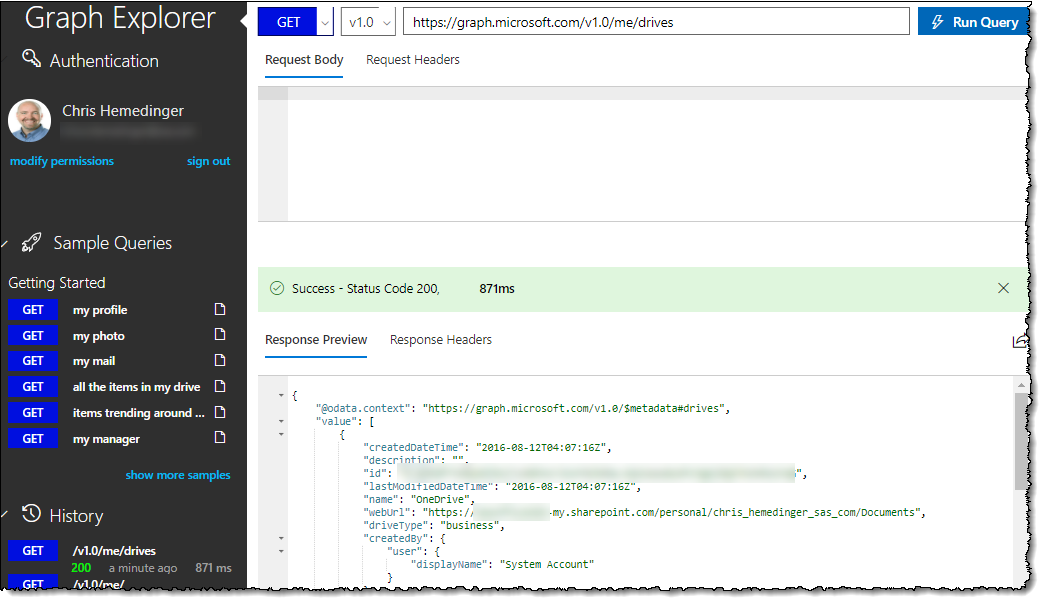
From the screenshots I’ve shared, you probably already noticed that these services are working on Microsoft Azure, which is Microsoft’s cloud platform for applications. For the remainder of this article, I’ll be using methods from the Microsoft Graph API. This REST-based API provides access to almost all of Microsoft’s hosted services. For my examples, I’ll be using methods within the Files component of the API: Drives and Drive Items (folders and files).
You can explore and try the Microsoft 365 APIs with the Graph Explorer application from Microsoft. If you sign in with your own account, you can use the APIs with your own data. This is a great way to try these APIs and discover the correct methods to use before implementing them in your SAS code.
Initializing and refreshing the access token in a new session
Now that we have the access and refresh tokens, we can get down to business with some actual SharePoint and OneDrive interactions. Use the %initSessionMS365 macro routine to exchange the refresh-token stored in token.json for an active non-expired access token.
When this is successful, you will see notes similar to these in the SAS log:
M365: Reading token info from token.json
M365: Token expires on 26JUL2024:10:04:22
The Microsoft Graph API session token is stored in the macro variable &access_token, which is referenced implicitly in the other macro routines in this package. It’s going to be another long and illegible (>700 characters) value.
(Ever hear of the “infinite monkey theorem?” That a monkey hitting a typewriter for an infinite amount of time is certain to produce a certain text, such as the complete works of Shakespeare? Well, that monkey is not going to produce this access token. Plus, who has a typewriter anymore?)
With the authenticated session established, you can use PROC HTTP to execute any API endpoint that your app permissions allow. For example, with User.Read (most apps have this), you can list your own account profile details:
filename resp temp; proc http url="https://graph.microsoft.com/v1.0/me" oauth_bearer="&access_token" out=resp; run; data _null_; rc=jsonpp('resp','log'); run; filename resp clear; |
This is a useful test API call to make sure everything is set up and working. If you’re following along and you don’t get a good result from this, it’s time to back up and retrace your steps before trying the remaining examples in this article. See the “Troubleshooting” section on the GitHub project for guidance and tools, including a PowerShell script that you can use outside of your SAS environment to make sure your Microsoft 365 connection is working as expected.
Example workflow: Using SAS code to explore SharePoint Online/Teams folders
Let’s look at content in SharePoint Online. Remember that files that you store in Microsoft Teams channels are also using SharePoint behind the scenes, so the process is the same for exploring content in Teams.
To simulate the experience of “drilling down” into folders and subfolders to find the file we want, we use an iterative approach to list content items. Each provided SAS macro produces an output data set with the list of folders and files in the current location. We can then use PROC SQL with SELECT INTO to store the unique ID of our next target into a macro variable, then use that macro variable as input into the next step.
Let’s start with the %listSiteLibraries macro routine to get the root level content for our site:
/* Let's look at SharePoint / Teams folders */ %let siteHost = sasoffice365.sharepoint.com; %let sitePath = /sites/SASandMicrosoft365APIdemo; /* stores the libraries metadata in work.libs */ %listSiteLibraries( siteHost=&siteHost.,sitepath=&sitePath.,out=libs); /* store the ID value for the library in a macro variable, where "Documents" is at root */ proc sql noprint; select id into: libraryId from libs where name="Documents"; quit; /* LIST TOP LEVEL FOLDERS/FILES */ /* special macro to pull ALL items from root folder */ /* stores the folder items metadata in work.paths */ %listFolderItems(driveId=&libraryId., folderId=root, out=work.paths); proc print data=paths (obs=10); run; |

“Drill” into that top folder to see the subfolders the next level down:
proc sql noprint; select id into: folderId from work.paths where name="Team Content"; quit; %listFolderItems(driveId=&libraryId., folderId=&folderId., out=work.paths); proc print data=paths (obs=10); run; |

Now drill into that folder to see its subfolders and content.
proc sql noprint; select id into: folderId from work.paths where name="Reports"; quit; %listFolderItems(driveId=&libraryId., folderId=&folderId., out=work.paths); proc print data=paths (obs=10); run; |

Download a file from SharePoint and import to SAS
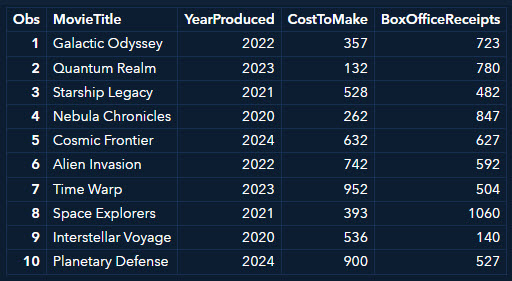
Now that we found the folder that contains the file we want (SciFi-AI.xlsx), we can use the %downloadFile macro to bring it into our SAS session. In this example, I’m storing the downloaded file in the WORK folder (so it will be deleted from here when the SAS session ends).
%let localFolder = %sysfunc(getoption(WORK)); %downloadFile(driveId=&libraryId., folderId=&folderId., sourceFilename=SciFi-AI.xlsx, destinationPath=&localFolder.); |
Note: We now have the IDs for the SharePoint library (drive) and the folder for this content, we can store them and use in future code, since they will not change. Then next time we want to do this download, we can skip the “query and discover” steps and go directly to the download step.
%put &=libraryId.; %put &=folderId.; %let reportLibrary=&libraryId; %let reportFolder=&folderId; |
With that file downloaded and in a local folder, we can now PROC IMPORT as an Excel file.
/* Downloaded an Excel file into SAS? Now we can PROC IMPORT if we want */ proc import file="&localFolder./SciFi-AI.xlsx" out=scifi dbms=xlsx replace; run; /* Preview the contents of this imported file */ proc print data=scifi (obs=10); run; |
About Sensitivity Labels: Does your organization use Microsoft 365 sensitivity labels to categorize and protect information? If so, this may affect your ability to read SharePoint or OneDrive files in SAS (or in any other app outside of the Microsoft 365 platform). See Working with Microsoft Sensitivity Labels in SAS programs to learn more.
Upload a file from SAS into SharePoint
Now let’s use the %uploadFile macro to send a SAS-generated report file to this Teams/SharePoint folder.
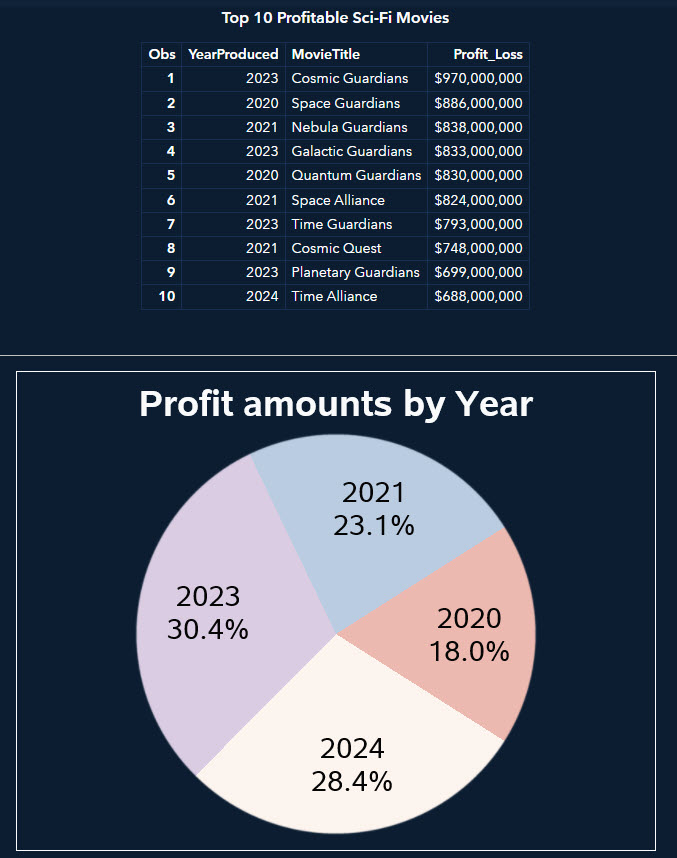
First, let’s generate a report in Excel format to share. We’ll use the data that we downloaded and imported as the source material.
proc sql; create table withProfit as select t1.*, (t1.BoxOfficeReceipts - t1.CostToMake) * 1000000 as Profit_Loss format=dollar12. from scifi t1 order by Profit_Loss desc; quit; filename report "&localFolder./SciFi-Summary.xlsx"; ods excel(id=xl) file=report options(sheet_interval='none' sheet_name='MOVIES'); ods graphics on / imagefmt=png; Title "Top 10 Profitable Sci-Fi Movies"; proc print data=withProfit(obs=10); var YearProduced MovieTitle Profit_Loss; run; title height=3 "Profit amounts by Year"; proc sgpie data=withProfit; styleattrs datacolors=(cXfbb4ae cXb3cde3 cXccebc5 cXdecbe4); pie YearProduced / response=Profit_Loss datalabelattrs=(Size = 22pt) datalabeldisplay=(category percent); run; ods excel(id=xl) close; |
This code produces report content that looks like this, and stores it in an Excel file named SciFi-Summary.xslx:
Using the IDs for the SharePoint library and folder that we stored from earlier steps, we can use the %uploadFile macro to send it to SharePoint:
%uploadFile(driveId=&reportLibrary., folderId=&reportFolder., sourcePath=&localFolder., sourcefilename=SciFi-Summary.xlsx); |
The %uploadFile macro is doing a lot of work behind the scenes. It splits the source file into multiple “chunks” for uploading, and then uses a special “upload session” API to transfer those pieces to Microsoft 365. It works sort of like a Star Trek transporter: it disassembles the file on the local side, and it’s reassembled in place in the SharePoint destination folder. (Beam up your file to your Teams site, Scotty!)
If you repeatedly upload a file to the same destination (for example, a new version of the file each day or week), SharePoint keeps track of those versions for you in its Version history: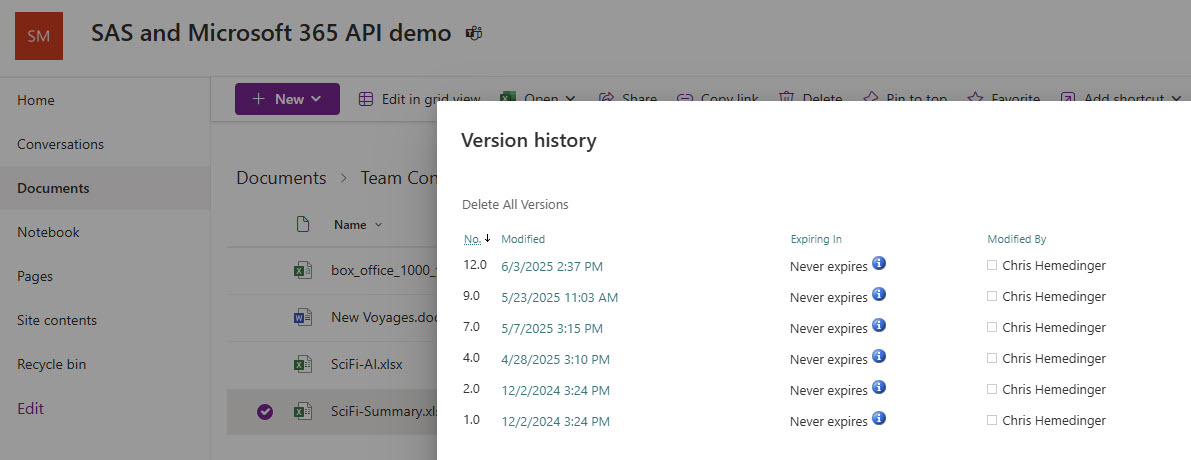
Example workflow: Using SAS code to explore OneDrive
Most of the actions that we can perform with SharePoint folders, we can also do with OneDrive. The main difference is that the API to list OneDrive root content is different, so we have a special routine called %listMyDrives.
/* Exploration: get the list of top-level drives in OneDrive */ %listMyDrives(out=work.drives); proc print data=drives; run; |
From the available “drives”, we can use PROC SQL to single out the ID for the main “Documents” folder and then list its contents.
/* If you have multiple drives you can filter the set with a where clause on the name value. Note that the system may track additional drives behind-the-scenes, so don't assume you have just one! In my case, the main drive is labeled "Documents". */ /* store the ID value for the drive in a macro variable */ proc sql noprint; select id into: driveId from drives where driveDisplayName="Documents"; quit; /* LIST TOP LEVEL FOLDERS/FILES */ /* special macro to pull ALL items from root folder */ /* Note that the APIs return only 200 items at a time */ /* This macro will iterate through multiple times to get the full */ /* collection. */ %listFolderItems(driveId=&driveId., folderId=root, out=work.paths); /* preview a few of these */ proc print data=paths (obs=10); run; |
From this point on, you can follow the same methods used for SharePoint, already covered earlier. Listing folder items, downloading a file, and uploading a file all work using the same routines as for SharePoint.
ACCESSING MICROSOFT 365 FROM SAS (SAS Innovate 2025)
More about using REST APIs from SAS
This has been a monster article — in terms of its length. But I hope it’s clear enough to follow and has sufficient detail for you to try this on your own. If you have questions, post in the comments.
I’ve published a number of other articles about using REST APIs from SAS — it’s one of my favorite things to do. Check out: